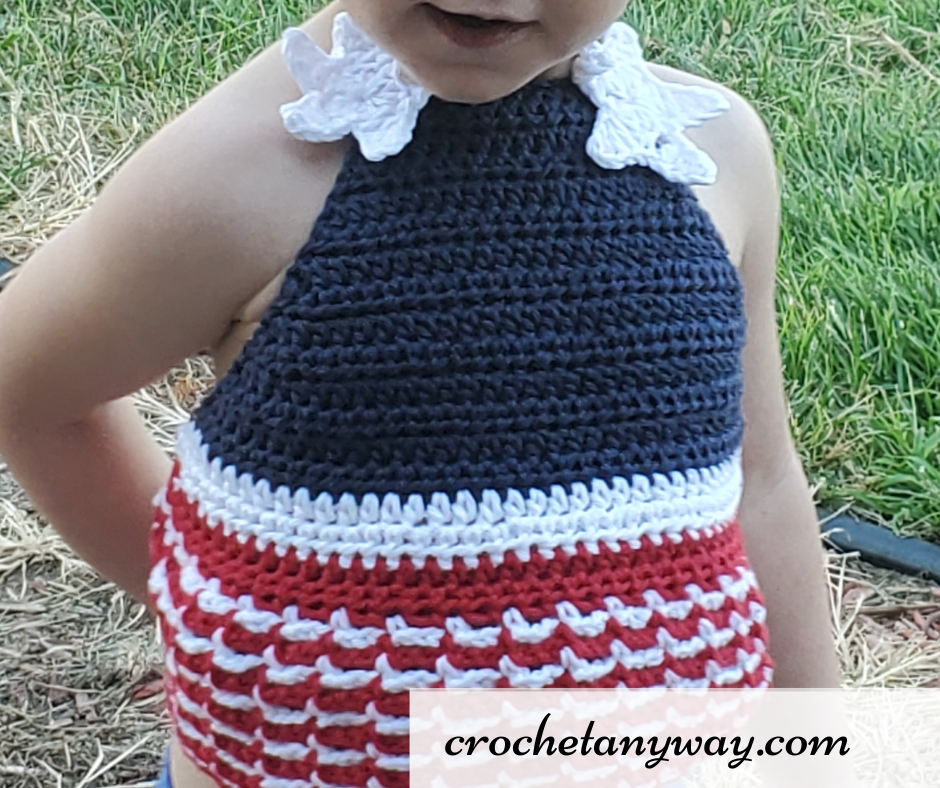
If you are searching for a different version of the face mask that doesn’t go around the ears, then read more. This mask will tie at the back and also can hang down when you need a break. It’s good for anyone who doesn’t like the elastic on the back of their ears or for someone with a hearing aid.

This post contains affiliate links for which I may make a small commission with no extra cost to you should you decide to purchase. This only keeps the blog going and I’m able to give some recommendations. Thanks for your support. Full disclosure and privacy policy here.

No claims that this mask will be effective against the virus. If you have been sheltering in place during this long shutdown, You probably already have a mask, But as the closed places begin to open, we will need more than one mask. This crocheted mask is just another option for you.

It was inspired by a type of cloth mask that my mother has been making. The mask is partially adjustable with the ties on the back.
If you have longer hair, this style works well with a bun or ponytail.
When you need a breather, untie the top part of the mask, and allow the mask to hang from your neck until you need to cover your mouth/nose again.

This style is good for people with hearing aids or who have any other issues for not wanting to wear the type of mask that goes around the ears.
It is worked from side to side at first, increasing on one side and decreasing on the other side. Then single crochet around the entire mask. You will make ties and you will make a chain that will be behind your head.

This pattern is Free here on my website or if you would like to purchase an ad-free pattern in pdf format that you can download, it is available on Etsy. Thank you for your support!
Please read through the entire post to decide which way you will make your mask as I’ve written two versions of the basic mask section. The first way has a sharp increase and a less sharp decrease. However, to me, this version seemed to work better. The second version has a sharp decrease as well as a sharp increase, this version tended to make the mask a bit more round. Also remember that when you single crochet around the entire mask that it will tend to make the mask a bit more round. Single crochet every other row in the border.

Materials:
Weight size 4 yarn (red heart super saver and caron simply soft)
hook size 5.00mm/ H
To check if you have the correct crochet hook for this pattern, here is a crochet hook conversion tool for you.
Stitches and abbreviations:
sc = Single crochet ; insert your hook into the stitch, yarn over and pull up a loop, (you have 2 loops on your hook) yarn over and pull through both.
sc2tog = single crochet two together
sc x 2 is the increase ; make 2 single crochet in the same stitch
inc = increase (by sc x 2 in the same stitch)
First Version ( the decrease side will seem to be crocheted differently than the increase side)
Chain 9
Row 1: sc in the second chain from the hook and across the row (8) ch 1 and turn
Row 2: sc, sc, sc, (inc) sc x 2, sc x 2, sc, sc, sc (10) ch 1 and turn

Row 3: sc in all stitches across (10) ch 1 and turn
Row 4: sc in the first 4, sc x 2, sc x 2, sc in the last 4 stitches (12)
ch 1 and turn
Row 5: sc in all stitches across (12)ch 1 and turn
Row 6: sc in the first 4, sc x 2 sc x 2 sc x 2 sc x 2, sc 4 (16) ch 1 and turn

Row 7: sc in all stitches across (16) ch 1 and turn
Row 8: sc, in the first 7, sc x 2 sc x 2, sc in the last 7 stitches (18) ch 1 and turn
Row 9: sc in all stitches across (18) ch 1 and turn
Row 10: sc in the first 8 stitches, sc x 2, sc x 2, sc in the last 8 stitches (20) ch 1 and turn
Row 11: sc in all stitches across (20) ch 1 and turn
Row 12: sc in all stitches across (20) ch 1 and turn
Row 13: sc in all stitches across (20) ch 1 and turn
Row 14: sc in all stitches across (20) ch 1 and turn
Row 15: sc in all stitches across (20) ch 1 and turn
Row 16: sc in all stitches across (20) ch 1 and turn
Row 17: sc in all stitches across (20) ch 1 and turn
Row 18: sc in the first 8 stitches, sc2tog, sc2tog, sc in the last 8 stitches, (18) ch 1 and turn
Row 19: sc in all stitches across (18) ch 1 and turn
Row 20: sc in the first 6 stitches, sc2tog, sc2tog, sc in the last 6 stitches (16) ch 1 and turn
Row 21: sc in all stitches across (16) ch 1 and turn
Row 22: sc in the first 6 stitches, sc2tog, sc2tog, sc in the last 6 stitches (14) ch 1 and turn
Row 23: sc in all stitches across (14) ch 1 and turn
Row 24: sc in the first 5 stitches, sc2tog, sc2tog, sc in the last 5 stitches, (12) ch 1 and turn
Row 25 sc in all stitches across (12) ch 1 and turn
Row 26: sc in the first 4 stitches, sc2tog, sc2tog, sc in the last 4 stitches(10) ch 1 and turn

Row 27: sc in all stitches across (10) ch 1 and turn
Row 28: sc in the first 3 stitches, sc2tog, sc2tog, sc in the last 3 stitches (8) Tie off and weave in the ends
sc around the entire mask (sc at the end of every other row)
attach to top corner A and chain 55-60
tie off and weave in the ends on the mask part
attach to the other corner B and chain 55-60 tie off
this will be the ties that you tie at the top of the back of your head.
Attach yarn to the corner C chain 50 – 65 attach to corner D to form a chain that will be used to let the mask hang if wanted.

Second Version (more rounded) The difference is in row 22)

Chain 9
Row 1: sc in the second chain from the hook and across the row (8) ch 1 and turn
Row 2: sc, sc, sc, (inc) sc x 2, sc x 2, sc, sc, sc (10) ch 1 and turn
Row 3: sc in all stitches across (10) ch 1 and turn
Row 4: sc in the first 4, sc x 2, sc x 2, sc in the last 4 stitches (12)
ch 1 and turn
Row 5: sc in all stitches across (12)ch 1 and turn
Row 6: sc in the first 4, sc x 2 sc x 2 sc x 2 sc x 2, sc 4 (16) ch 1 and turn
Row 7: sc in all stitches across (16) ch 1 and turn
Row 8: sc, in the first 7, sc x 2 sc x 2, sc in the last 7 stitches (18) ch 1 and turn
Row 9: sc in all stitches across (18) ch 1 and turn

Row 10: sc in the first 8 stitches, sc x 2, sc x 2, sc in the last 8 stitches (20) ch 1 and turn
Row 11: sc in all stitches across (20) ch 1 and turn
Row 12: sc in all stitches across (20) ch 1 and turn
Row 13: sc in all stitches across (20) ch 1 and turn
Row 14: sc in all stitches across (20) ch 1 and turn
Row 15: sc in all stitches across (20) ch 1 and turn
Row 16: sc in all stitches across (20) ch 1 and turn
Row 17: sc in all stitches across (20) ch 1 and turn
Row 18: sc in the first 8 stitches, sc2tog, sc2tog, sc in the last 8 stitches, (18) ch 1 and turn
Row 19: sc in all stitches across (18)
Row 20: sc in the first 6 stitches, sc2tog, sc2tog, sc in the last 6 (16)
Row 21: sc in all stitches across (16) ch 1 and turn
Row 22: sc in the first 4 stitches, sc2tog, sc2tog, sc2tog, sc2tog, sc in the last 4 stitches (12) ch 1 and turn
Row 23: sc in all stitches across (12) ch 1 and turn
Row 24: sc in the first 4 stitches, sc2tog, sc2tog, sc in the last 4 stitches (10) ch 1 and turn
Row 25: sc in all stitches across (10) ch 1 and turn
Row 26: sc in the first 3 stitches, sc2tog, sc2tog, sc in the last 3 (8) tie off and weave in the ends
sc around the entire mask (single crochet in every other row)

attach to top corner A and chain 55-60
tie off and weave in the ends on the mask part
attach to the other corner B and chain 55-60 tie off
this will be the ties that you tie at the top of the back of your head.
Attach yarn to the corner C chain 50 – 65 attach to corner D to form a chain that will be used to let the mask hang if wanted.
Optional
To make a filter pocket:
same materials
Stitches:
dc=double crochet
Chain 10
Row 1: dc in the 4th stitch from your hook,
and dc across (9) ch 2 and turn
Row 2: dc in all across (9) ch 2 and turn
Row 3: dc in all across (9) ch 2 and turn
Row 4: dc in all across (9) ch 2 and turn
Row 5: dc in all across (9) ch 2 and turn
Row 6: dc in all across (9) ch 2 and turn
Row 7: dc in all across (9) ch 2 and turn
Row 8: dc in all across (9) ch 2 and turn
Row 9: dc in all across (9) ch 2 and turn
Row 10: dc in all across (9)
use a long tail to attach the pocket to the mask.
Attach the filter pocket
to the inside of your mask
and insert your filter

Please leave a comment and as always let me know if you need help with these patterns and I will try to make things more clear.
For more Free Patterns
or my ravelry store
There are patterns and printables in my Etsy store
https://www.pinterest.com/crochetlife2/
https://www.instagram.com/crochetanyway/
https://twitter.com/AnywayCrochet